Even More Tips for Your First Art Fair
The Prizum team has gone on the road with clients to trade shows, and even for personal projects! Most recently, Prizum Art Director Nina, took her talents to the Bitchcraft Fair at the David L. Lawrence Convention Center.
In Part III, we’ll give you even more tips and resources from Nina’s Bitchcraft Fair experience, that’ll leave you feeling more than ready to tackle your first art fair! Let’s pick up where we left off…

Okay, but What Trade Show Display & Booth Tips Do you Got for Me?!
A lot of the fair-goers and even the other vendors, were surprised that it was Nina’s first time at a fair because she made sure to take in as much advice from our blogs, her friends, family, online research, and her general marketing/display knowledge!
Display & Booth Trade Show Tips:
Rule #1: Branding.
Make sure that people know it’s you. That goes for any signage, business cards, even on the actual products. Brochures, banners, bags, pricing signs, sign-up sheets, etc. Have your name on your prints, whether that’s on front or back, on the buttons (buttons usually have a rim that’s perfect spot for your name / Instagram handle / website), stickers, anything else you’ll have.
Go Vertical!
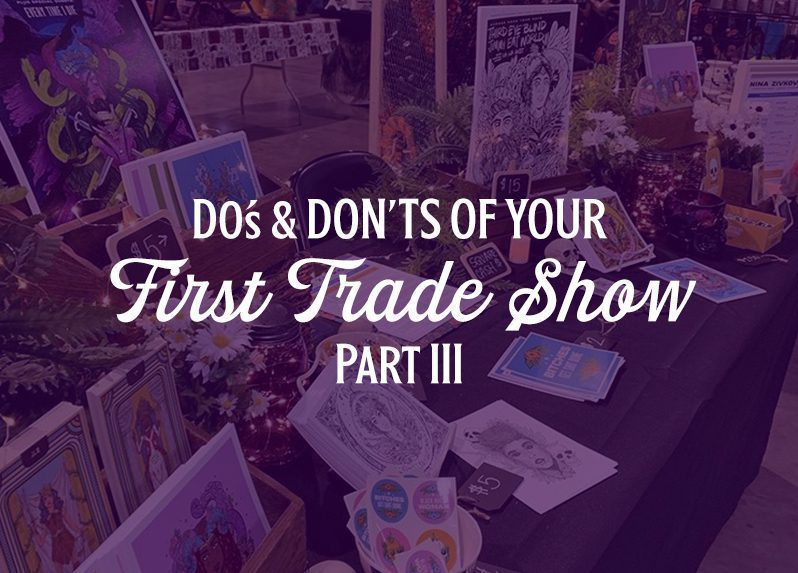
As much as you can, go vertical on your table. Nina even grabbed some of her favorite books and stacked them underneath her crates and holders to prop them up higher. Then, to cover up the books, she added faux flowers/leaves, which added to the overall mood and look of her booth. If you can rise anything up, make sure you do! It’s good to also stagger items. Have some right on top of the table, then a little higher, lower, higher, etc. That way you have some visual interest and get eye-movements… moving!
And, don’t limit just your table to go vertical.
Remember that backdrop Nina bought? Plus, the table runner? After looking at all the other vendors table clothes/runners being in the front of the table (as they normally are), Nina realized that people would be standing in front of them and would make it a little difficult to see. If you don’t have a branded backdrop or banner, she recommends using your table runner as a banner! Now people could stand in front of her booth and anyone walking past, or even standing in front, would be able to see her name and quick info!
Iron or put your backdrop sheet/tapestry and table runner before hand (double-check cleaning instructions).
Fold lines aren’t that bad, but wrinkle makes your display look unkempt. The morning of, Nina placed her backdrop sheet in the dryer to make sure it wasn’t wrinkled!
Add lights!
Since Nina didn’t rent electricity, she personally already had fairy-string-lights that were battery operated as well as Edison-bulb-esque battery operated lights. She used the latter on top of her backdrop along with flower garland to give it a more welcoming feel, and then added the additional fairy lights and flower/leaves around her display for visual interest.
Speaking of visual interest. Make sure you lay out your products interestingly.
Nina made sure to add her framed pricing sheets to the end of each side, and then also added little chalkboard price-tags next to some pieces (but not all) that way the customer had to ask and interact with her – if they didn’t look at the sheets. She also had her attention grabbing pieces on the corners and in the center – they made fair-goers stop, which gave her ample time to greet them and talk with them. She also had black & white, and color prints, but laid them out in alternating patterns, that way one side wasn’t all black & white, and one wasn’t all color. Added visual movement and interest!
The night before and the morning of, Nina lightly sprayed peppermint and lemon essential oil sprays on her cloth and display items. It gave the display a subtle fresh and alert smell.
You don’t have to put all of your products on your table/up on display. Have backups ready to go to refill as people buy them. So you always look full, without being overfull.
Be prepared to rearrange as needed.
Nina found that some people didn’t look at certain prints, so as time went on, she moved them behind others, and propped up the ones that did get people’s reactions. Some items, people didn’t even see because they were just a little bit tucked behind something else, make sure you’re aware of your surroundings in front and behind.
And, make sure to keep your table clean.
When a lot of people are looking and moving things around, they might be in a rush and leave your pieces in shambles. Tidy up as much as you can so the next set of people don’t see a mess.
Try to keep your products in sight.
Some of Nina’s items were confused as freebies (since they were in bowls like trick-o-treats would be), but thankfully Nina had the items in sight so that they weren’t ’stolen-on-accident’.
Read our post on “Using the 5 Senses: Trade Show Booth Strategy” for additional tips that highlight Sight, Sound, Smell, Taste, and Touch ideas.
You’ve Bought Everything You Need, Now What’s Next?! The Trade Show, of course!
Lay out your trade show booth set-up beforehand.
Even if you don’t have a table as large as the one you’ll have at the fair, set it up on the floor or on another surface. You can also do digital mockups, but it does help to see how the display would look in reality.
Make sure you pack up for the trade show the night before (if it’s a local show, which for Nina, it was).
If you have to travel further, keep that in mind! Nina did have all of her items packed, but not inside her car. She does recommend doing so the night before for a quick trip in the morning. But, if it’s summer time or winter time, be mindful of the heat and cold. If it’s too much of either, that could ruin your products or display items!
Even if you have a simple trade show display, or if you’ve put your display together a million times before, get there as early as possible.
The fair opened for vendors at 7am and the show opened at 11am. If you don’t have a helper or they fair doesn’t provide volunteers to unload your items or you don’t have a cart, etc., definitely make sure you get to the venue on time. Some places are strict on parking time in their unloading zones. And, keep in mind parking, too. Not all venues include parking fees in there costs.
If you’re unloading on your own, don’t grab all the heavy stuff first.
Grab a few things, and find your booth/table first. It’s a bit more difficult to try to find your table (especially when there are 200+ vendors like the fair Nina went to), when you’re carrying heavy items.
If you do get to the trade show late (or maybe there was a line/traffic that backed you up), start with your table set-up first.
That way if you’re still setting up after the show opened, at least your products and main display are ready to go. Adding the final details like lighting, flowers/leaves, and the backdrop aren’t as important and crucial as your actual products will be.
After you’re all set up, next step is, stand up as much as you can.
The fair Nina went to was from 11am – 7pm (not including set-up and take-down time), so it was a long day of standing and interacting. Grab yourself water and food, and hopefully have a partner or two to help out. The Bitchcraft Fair was great at setting up solo-vendors next to each other to help each other out. Nina did have a helper – her mom! She was able to focus on the guests, while her mother helped with trick-or-treaters, bagging and cash purchases (and moral-support, of course)!
Standing allowed Nina to immediately get the attention of passerby’s (especially since a lot of Nina’s display was up higher). Instead of just saying “Hi” or smiling (which is also good and recommended), Nina made sure to interact more with people – especially with genuine compliments. People will be able to tell if you’re being fake, so if you don’t actually like someone’s hat or shirt, don’t say it! But just by telling someone their hat was great or costume was awesome (a lot of guests dressed up in Halloween gear), it made them stop and talk, which then lead to them either buying something or signing up for her mailing list.
And, when they are at your table looking at an item, don’t forget to tell them a little bit about the others – without getting too ‘used-car-sales-like.’ It was as simple as noticing them looking at the color zodiac prints and telling them she also had black and white ones, too. Or, when they liked an art print, she also offered it as a button, that was also soft-touch, and added “you’ve gotta touch it!”. Then, allowing them to continue the conversation if they wanted to – having it open to “any questions, comments, etc., let me know.”
Be genuine and excited about what you’re doing. If you are, people will see that and feel more inclined to start a conversation and potentially buy your product, too!
And, don’t forget to promote on social during the trade show if you can (be mindful of your battery!).
If you can’t do it, have your helper help you! Just a couple quick posts before, during, and after the show will keep your outside audience interested as well as the ones going to the show (and the ones you met & hopefully followed you after the show). Nina’s vendor neighbors were also great at tagging her in their posts and promoting her on their social media (and even selling products through them), and she made sure to do the same for them.
Don’t forget about your fellow vendors at the trade show, they can be super helpful at promoting you and vice versa.
Doing business cards swaps before/during/after is encouraged as well. Nina was able to gain additional followers/subscribers due to other vendors.
One additional note on social via a trade show, is to encourage your customers to promote the products they purchased on social media.
That was one aspect that Nina did not have a chance to do as much of, although, she was lucky that a few of her customers did so!
Fairs are a lot of work, but they are incredibly rewarding, especially if you are prepared and are able to have engaging conversations and interactions with the people who visit as well as the vendors.

What Else Should You Bring/Consider for a Trade Show or Art Fair?
A CART! WHEELS! Something with wheels (or another person)!
Nina recommends a cart above all else. She wishes so badly that she had a cart or a helper to unload everything at the trade show. DLCC did not allow carts with 4-wheels, only 2-wheels, so once again, confirm with your fair organizer what you’re allowed to bring!
Containers/Bags/Boxes:
For your display items and products. Make unloading easy and also re-loading, too!
Cash:
Since Nina’s prices weren’t too high, she kept a medium-base of cash (you might need more! or you might need less! Think your customers will need to break $100, keep that in mind! You might lose a sale!): 1 Sleeve of Pennies/Nickles/Dimes/Quarters, $30 in $1, $30 in $5s and $30 in $10s. And, don’t forget about a box or tray or holder to keep cash and change in. Surprisingly more people bought in cash versus credit/debit. Beforehand, many of the people Nina talked to said a lot of their sales were cards, but just to cover her bases, she did both – and it literally paid off!
Square Card Reader:
Did you know that signing up for Square is Free*?! And, they’ll send you a Free Card Reader* (either the lightning connector or headset jack versions). They have additional card readers that may better suit your needs or your particular device (phone/tablet). Double-check that your device can have the Square app on it, and that it’s able to connect with the reader (if it’s not wireless). You’ll also need to go in offline mode in most cases, too, which means data (unless you’re renting). There are fees involved, so read up!
[*for eligible merchants]
Portable Battery-Backups:
Since Nina didn’t rent electric, she made sure to bring along 2 fully-charged battery-backups just in case her battery would die from card swiping or social promoting, etc.
Actual Battery Backups:
Did you put in fresh batteries in your lighting (if you have it) or anything else that requires batteries? You should still bring backups. AA and AAA are definitely common, but check everything else that has a battery and bring another set to the trade show!
Email Sign-up Sheet (either via square or print out several sheets):
Nina didn’t have a chance to link up her mail chimp and square accounts to retrieve emails, but she did print out an email sign up sheet. Big rows so people have enough room to write quickly (smaller rows means they have to take a bit more time and it might overlap with other’s). She had an email address column, First/Last Name Column, and a Birthday Column (MM/DD) for upcoming birthday-based sales. Think of how you want to use your newsletter and the information you receive for the fair-goers.
Additional trade show tip:
As soon as the fair is over, make sure you (or a helper) update your Mailchimp (link: https://mailchimp.com) or other emailing platform, asap with your newly opted in emails! Nina also made a new ‘audience**’ in Mailchimp strictly for the Fair attendees. That way she could send them all a welcome message immediately and keep track of who she met at the fair versus her general subscribers.
**You’ll need at least an “Essentials” plan in Mailchimp (starting at $9.99 a month) to add more audiences. Another way aside from adding audiences, would be to ‘tag’ the new subscribers as the name of the Fair. That way you can still keep your free plan.
Bags:
Depending on what you’re selling, you may or may not need bags. For Nina, selling her art prints/buttons/stickers, she went for clear bags in two sizes. Larger clear bags for her larger prints via Amazon and smaller clear bags for the buttons/stickers/and small prints via Staples. Why clear bags? Marketing! Clear bags make your customer a mini-billboard. They’re now walking around with your product *hopefully* and literally in clear view. Additional marketing? Read the next bullet.
Business Cards:
While Nina did bring her business cards, she also had printed out stickers with her name & Instagram link on it to stick on the bags (again, marketing!). It was also helpful that she bought a TON because she was able to hand them out to people. They also, surprisingly, loved the fact that they were stickers! She bought them on Next Day Flyers (because she needed them quick!)
Pens, Markers:
People will need something to write with to sign up for your mailing list. Or you might need to write something down. Nina also brought Sharpies (gold/silver/bronze + a pack of black ones) to sign prints and posters for customers!
Screwdriver:
Remember our suggestion on bringing AA/AAA batteries? Well, you should also have a screwdriver, not only for your trade show display or products, but also in case you need it for other items. The batteries that Nina had in one of her lights didn’t work, so she have to unscrew them to open it up, and thankfully she brought along a tiny screwdriver!
Tape Measure:
For you, your trade show booth, your products, even your customers! You never know!
Tape (Duck tape, Masking Table, Clear Tape):
Definitely bring along some sort of clear tape (maybe you need to fix one of your display items). It also comes in handy when you’re packing up your trade show booth!
Sewing Kit:
Table cloth got a rip in it?! You might need to sew something up quickly!
And, reach out to your friends, family, and even other vendors you admire for advice and ideas. You’ll learn so much for just asking people about their experiences, that way you can avoid their unfortunate mistakes, or find better ways to display, set-up, etc. There are tons of online articles and blogs (like ours), too – soak in as much info as you can! We hope you have a successful and stress-free trade show!
Going to your first trade show and feel overwhelmed by how much planning and strategizing goes into it? Let us help relieve your stress. Our design team at Prizum loves to prepare clients for trade shows – especially their first one ever! Check out some other tradeshow materials we’ve worked on. Let’s get creative. Let’s get your (trade)show on the road!
